
Table of Contents
TQuant Lab is a back-testing platform developed by TEJ, extending from the well-known Zipline framework. All securities-related information in TQuant Lab originates from TEJ’s exclusive database, ensuring the high quality of data usage. Furthermore, as it is built on the foundation of Zipline, the program architecture has undergone third-party verification over the course of several years, guaranteeing accuracy in its implementation. Thirdly, TQuant Lab offers adjustable parameters for different trading constraints and costs, facilitating users in creating the most lifelike trading environment. If you are interested, please feel free to contact us for more information.
TQuant Lab offers installations for three operating systems or environments: Windows, Mac OS, and Google Colab. Before installing the modules, it is essential to have Anaconda installed. Instructions for installing Anaconda can be found in the Anaconda Introduction and Installation Tutorial.
Please download installation packages down below in advanced.
Open the Anaconda Prompt and enter the following code to create a virtual environment and install the necessary modules:
Window User
# Place yml file in below link
$ cd <C:\Users\username\Downloads>
# create virtual environment
$ conda env create -f zipline-tej.yml
# activate virtual environment
$ conda activate zipline-tej

Mac User
# Place yml file in below link
$ cd <C:\Users\username\Downloads>
# create virtual environment
$ conda env create -f zipline-tej_mac.yml
# activate virtual environment
$ conda activate zipline-tejIf you are well-versed in Python, you can manually create a virtual environment and install the required dependencies one by one.
# create virtual env
$ conda create -n <env_name> python=3.8

# activate virtual env
$ conda activate <env_name>

# download dependency packages
$ conda install -c conda-forge -y ta-lib
$ conda install -y notebook=6.4.11
$ conda install -c conda-forge nb_conda_kernels
$ conda install -y xlrd=2.0.1
$ conda install -y openpyxl=3.0.9
$ pip install zipline-tejSince TQuant Lab currently supports only Python 3.8 version, you can add a Python 3.8 runtime using the following code snippet:
!wget -O mini.sh https://repo.anaconda.com/miniconda/Miniconda3-py38_4.8.2-Linux-x86_64.sh
!chmod +x mini.sh
!bash ./mini.sh -b -f -p /usr/local
!conda install -q -y jupyter
!conda install -q -y google-colab -c conda-forge
!python -m ipykernel install --name "Python3.8" --user
!rm mini.sh
!pip install pandas==1.2.5
Next, follow these steps:
After changing the runtime type to Python 3.8, you can run the following code to download zipline-tej. If you encounter any version issues with yfinance and pandas, please proceed despite the warnings.
!conda install -y ta-lib -c conda-forge
!pip install zipline-tejSince TQuant Lab utilizes Taiwan stock market trading data provided by TEJ, we need to use a specialized trading calendar tailored for the Taiwanese stock market. This is crucial for subsequent back-testing purposes. Below, there are downloadable trading calendar files provided, and it’s necessary to place these files within the designated exchange_calendars folder. [Download]
After downloading the aforementioned trading calendar files, copy the exchange_calendar_tejxtai.py file and append it to the calendar_utils.py file within the exchange_calendars folder.
Navigate to the exchange_calendars folder located in the site-packages. Typically, it’s located at the following path:
Window user

**C:\Users\username\Anaconda3\envs\zipline-tej\Lib\site-packages\exchange_calendars**

Mac user

C:\Users\username\Anaconda3\envs\zipline-tej\Lib\python3.8\site-packages\exchange_calendars
Full tutorial please refer to Install TQuant Lab.
TQuant Lab retrieves price and volume data from the database built by TEJ and stores the data in memory as data bundles. You can determine the assets to be imported and the time range by configuring environment variables. The available environment variables for configuration are:
os.environ["TEJAPI_BASE"]: Connects to the TEJ database domain.os.environ["TEJAPI_KEY"]: Identifies the user.os.environ["ticker"]: Specifies the desired assets to retrieve.os.environ["mdate"]: Specifies the desired time range for retrieval.Once you’ve set up the environment variables, use the command !zipline ingest -b tquant to import the data into a local data bundle. This data bundle will be named “tquant”.
import os
import pandas as pd
import numpy as np
import matplotlib.pyplot as plt

os.environ['TEJAPI_BASE'] = "https://api.tej.com.tw"
os.environ['TEJAPI_KEY'] = "YOUR KEY"
os.environ['ticker'] = "IR0001 2330 2337 0050 2545"
os.environ['mdate'] = "20200821 20230821"

!zipline ingest -b tquant
After loading the data, we can visualize what we have imported by code down below.
from zipline.data.data_portal import get_bundle
data_bundle = get_bundle(
    bundle_name = 'tquant',
    calendar_name = 'TEJ',
    start_dt = pd.Timestamp("2020-08-21", tz = 'utc'),
    end_dt = pd.Timestamp("2023-08-21", tz = 'utc')
)
data_bundle.head(10)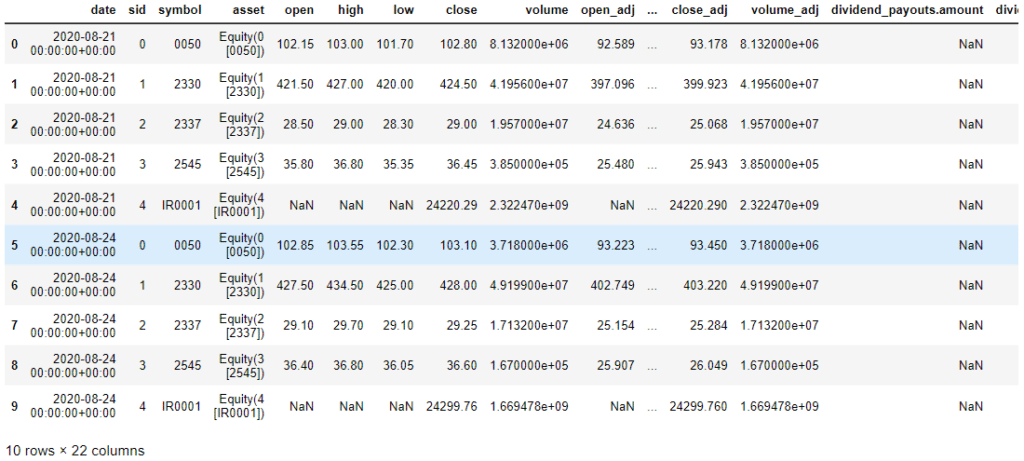
In this example, let’s consider a “Buy and Hold” investment strategy for Taiwan Semiconductor Manufacturing Company (TSMC) using TQuant Lab. We will create the strategy and perform back-testing. To begin, let’s import the necessary modules:
from zipline.api import set_slippage, set_commission
from zipline.finance import slippage, commission
from zipline.api import order, record, symbol
from zipline import run_algorithminitialize is one of the key functions for zipline backtesting. This function would be executed once before the backtesting starts. The main purpose of this function is to set up the backtesting environment, mainly setting slippage and commission:
Example:
def initialize(context):
    set_slippage(slippage.FixedSlippage())
    set_commission(commission.PerShare(cost=0.00285))
Besides, we can notice that there is an argument called context in initialize function. It is a persistent namespace for you to store variables you need to access from one algorithm iteration to the next. For example, we can set a variable (context.day = 0) to count the number of trading dates and a variable (context.has_ordered = False) to record whether holding the position of TSMC or not.
Example:
def initialize(context):
    context.day = 0
    context.has_ordered = False
    set_slippage(slippage.FixedSlippage())
set_commission(commission.PerShare(cost=0.00285))handle_data is another key function for zipline backtesting. This function would be executed every trading day. The main purpose of this function is to establish a trading strategy, place orders, and record trading information.
There are two arguments in handle_data – context and data. context is basically the same as above. To record whether we hold TSMC stock on each trading day, we set:
def handle_data(context, data):

    # plus 1 in each trading day。
    context.day += 1

    # check whether we hold TSMC stock in current trading day
    if not context.has_ordered:
Then we use zipline.order function to place orders. There are 6 different types of order methods. For detailed information, please check out Zipline Order (percent & target_percent), Zipline Order (value & target_value), and Zipline Order (order & order_target). Here, we use the most fundamental one:
Buy or sell n share of assets.
After adding the order(symbol("2330")) for placing an order, we set context.has_ordered to True, so we will no longer place an order after this trading day.
def handle_data(context, data):

    context.day += 1
    if not context.has_ordered:

        order(symbol("2330", 1000)

        context.has_ordered = True
Eventually, to record the number of trading days, whether we hold TSMC stock or not, and stock price, we can use record function. This function enables users to record trading information and turn to columns in the data frame from run_algorithm.
record(column name = information)In today’s case, we record the numbers of trading days (context.day), whether holding position or not (context.has_ordered), and today’s closed price (data.current(symbol(“2330”), “close”)). This data is equivalent to data mentioned in handle_data arguments. data restores stocks’ price and volume information. To get current price or volume info, we can use data.current().
Call stocks’ current price and column
We want to record TSMC close price:
def handle_data(context, data):
context.day += 1
if not context.has_ordered:
order(symbol("2330", 1000)
context.has_ordered = True
record(
trade_days = context.day,
has_ordered = context.has_ordered,
TSMC = data.current(symbol("2330"), "close")
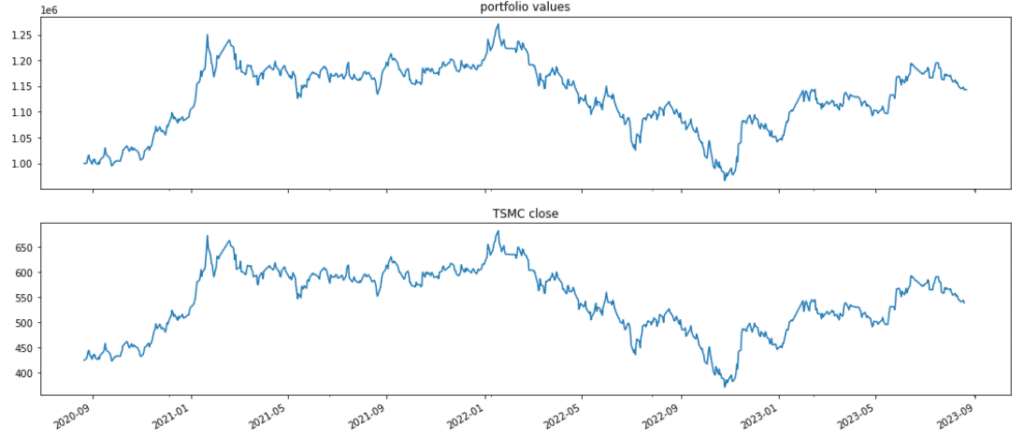
)Analyze function is for performance and risk visualization. There are two arguments for this function. The first one is context, and it is the same as the previously mentioned one. Another one is perf, which is the final data frame from run_algorithm. We can use specific columns in the final data frame for visualization.
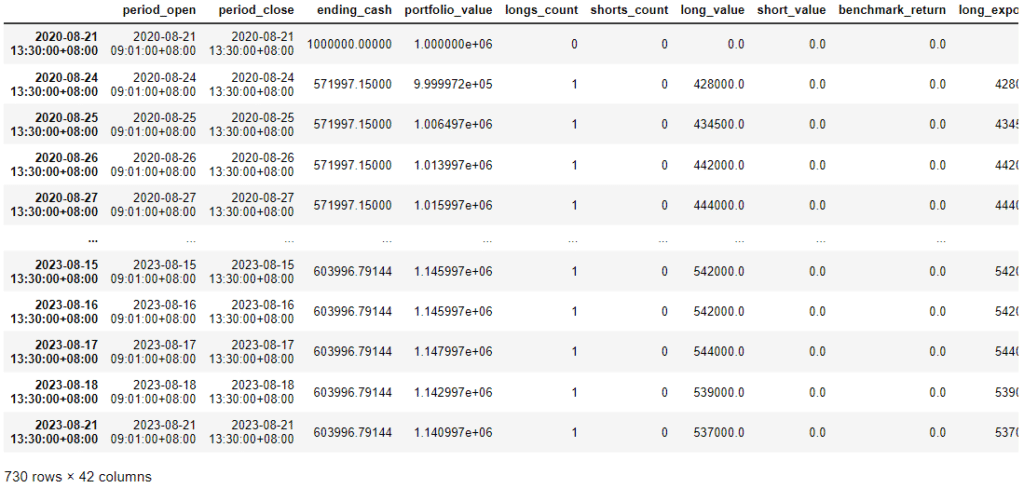
This function is for running the backtest. It will return a performance-related data frame. For detailed information, please check out TSMC buy and hold strategy. Here, we demonstrate the argument for this function:
start_date = pd.Timestamp('2020-08-21',tz='utc')
end_date = pd.Timestamp('2023-08-21',tz='utc')

results = run_algorithm(start= start_date,
                       end=end_date,
                       initialize=initialize,
                       capital_base=1e6,
                       analyze=analyze,
                       handle_data=handle_data,
                       data_frequency='daily',
                       bundle='tquant'
                       )
The main purpose of this article is to help users understand how to use TQuant Lab. TQuant Lab is a quantitative backtesting platform developed by our company. Compared to self-built backtesting platforms, TQuant Lab offers highly accurate price and volume data, precise performance and risk calculations, and a realistic simulated trading environment. In the future, we will provide more articles about trading strategies deployed on TQuant Lab. Please stay tuned and continue to support us.